
Improve your remarketing campaigns by 300% with Google Tag Manager

I know of a funded development start-up that had a huge cash infusion. They were burning through USD 50,000 a month on Facebook Ads with nothing much to show. As a PPC agency, we hope, this isn’t you.
Advertising wastage is a real thing and it’s scary how some businesses lack the prudence to use money wisely.
So let’s just dive right in and look into how we can save some of the marketing dollars that we are allocated to spend.
 Let’s start by using GTM to implement our remarketing pixel. Grab your Google Ads or Facebook Pixel tracking code. At this point, we’ll be going with the assumption that GTM is already installed on your website. If not, read Google’s installation guide here.
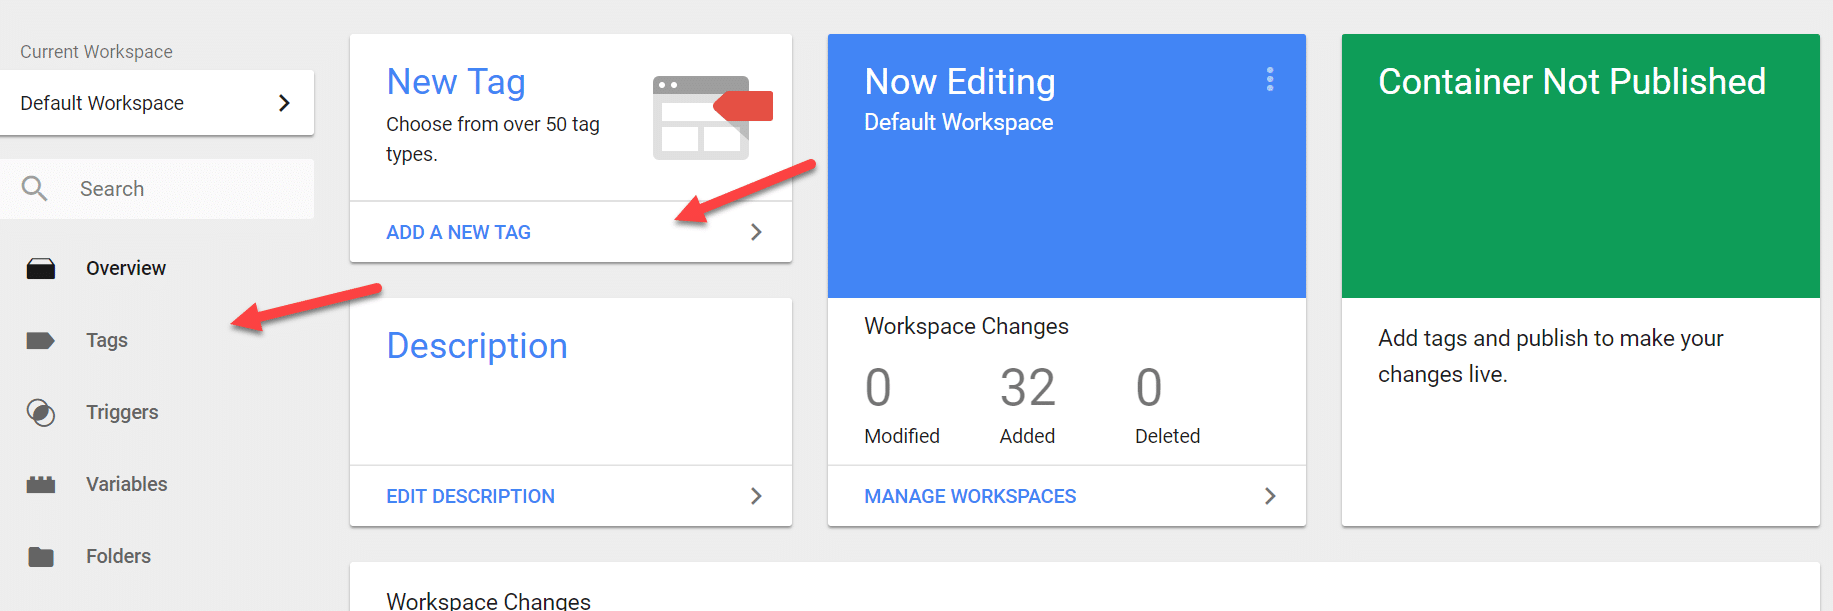
We’ll want to put any tracking code into the “Tags” portion of the Google Tag Manager dashboard.
Let’s start by using GTM to implement our remarketing pixel. Grab your Google Ads or Facebook Pixel tracking code. At this point, we’ll be going with the assumption that GTM is already installed on your website. If not, read Google’s installation guide here.
We’ll want to put any tracking code into the “Tags” portion of the Google Tag Manager dashboard.
 Click on Tags and, once you are there, you can click on New to add a new tag. Or, you can click on Add a new tag to add a new tag directly.
There are a number of tags that are supported, including Google Analytics – which you could add via GTM as well.
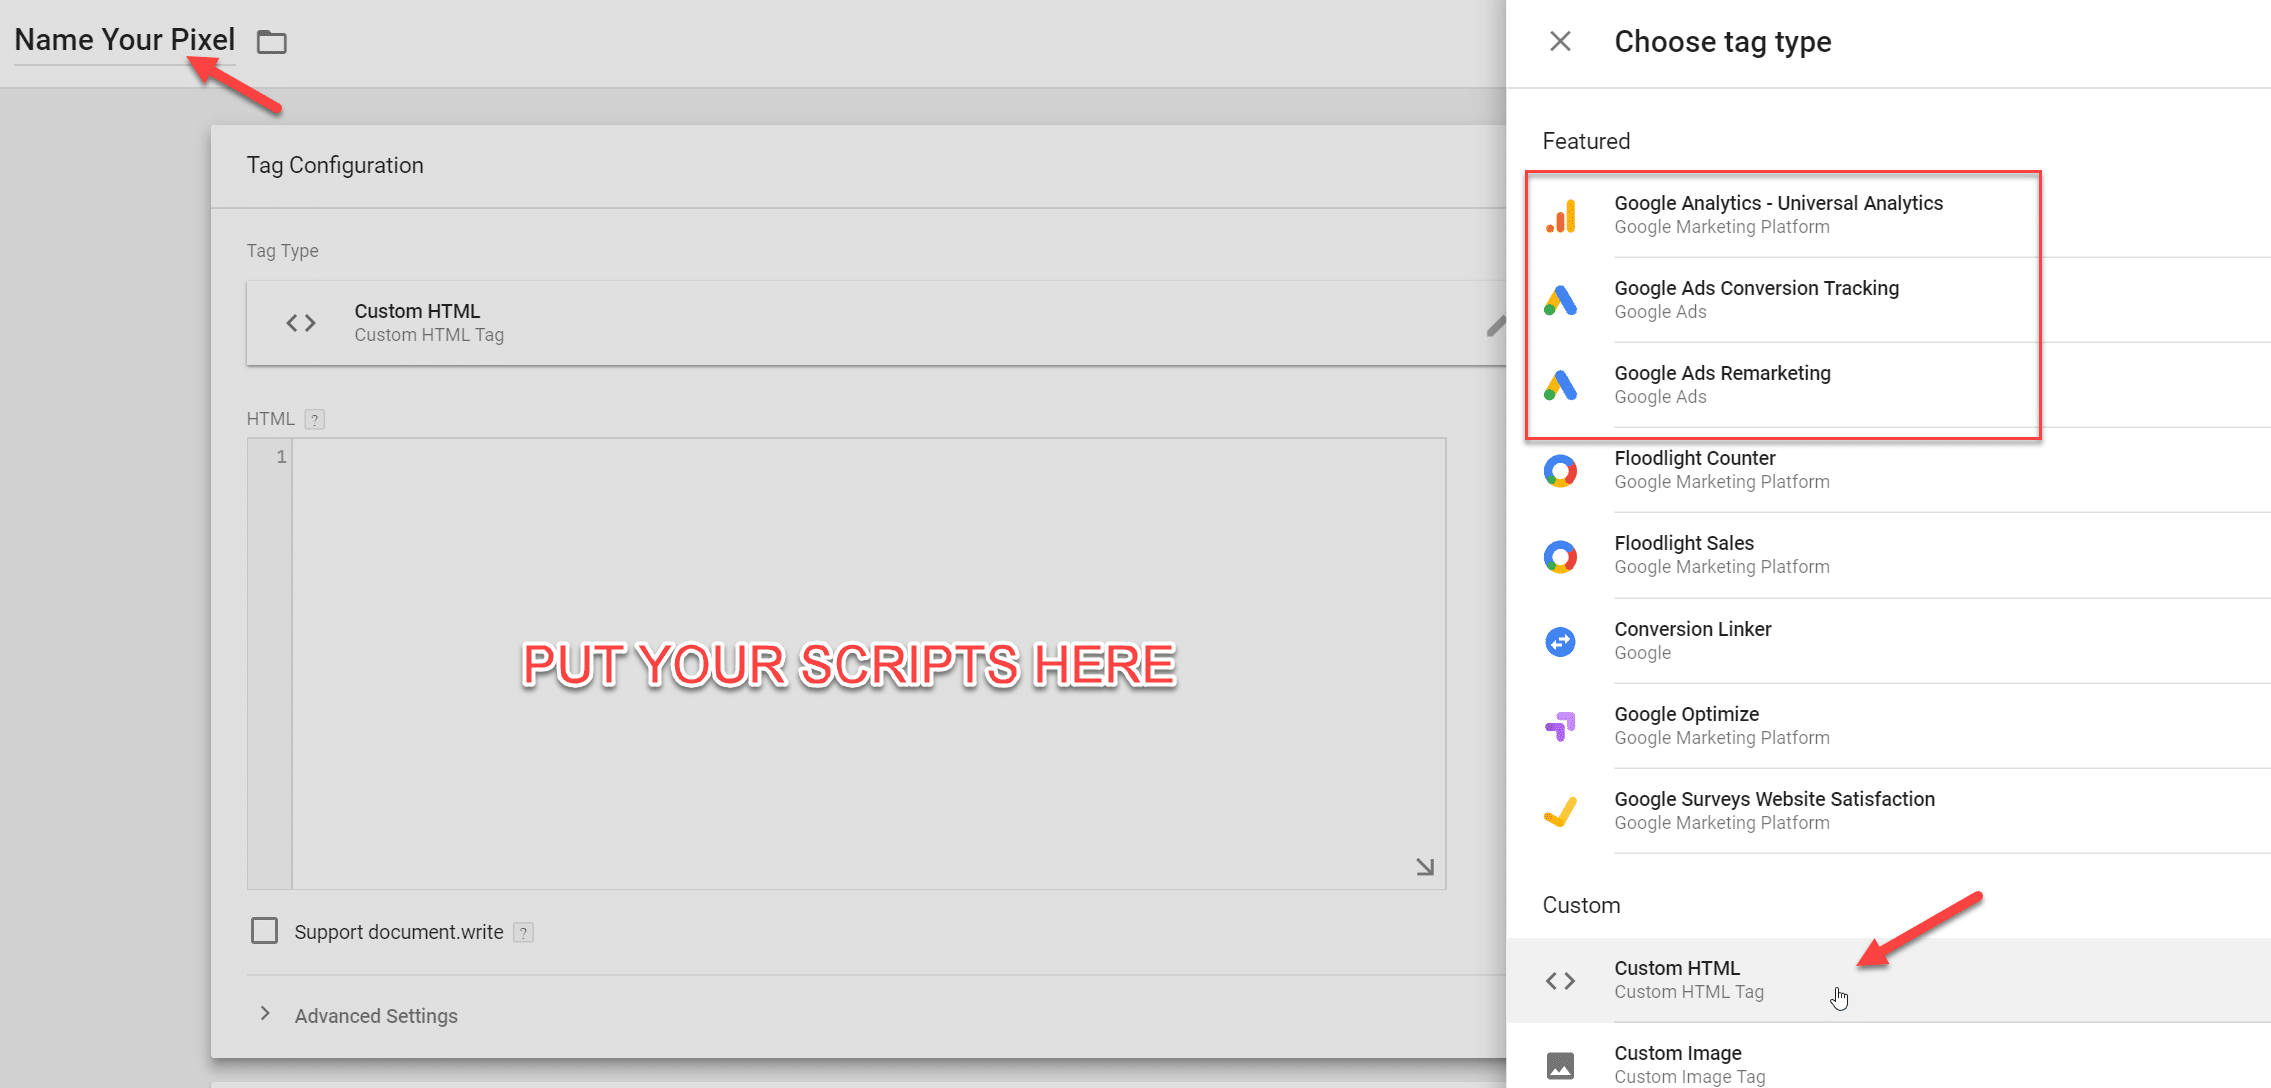
But let’s say we want to add in our custom remarketing code. Choose Custom HTML.
Click on Tags and, once you are there, you can click on New to add a new tag. Or, you can click on Add a new tag to add a new tag directly.
There are a number of tags that are supported, including Google Analytics – which you could add via GTM as well.
But let’s say we want to add in our custom remarketing code. Choose Custom HTML.
 Add in your tracking script into the blank area.
Remember to name your tag and hit Save.
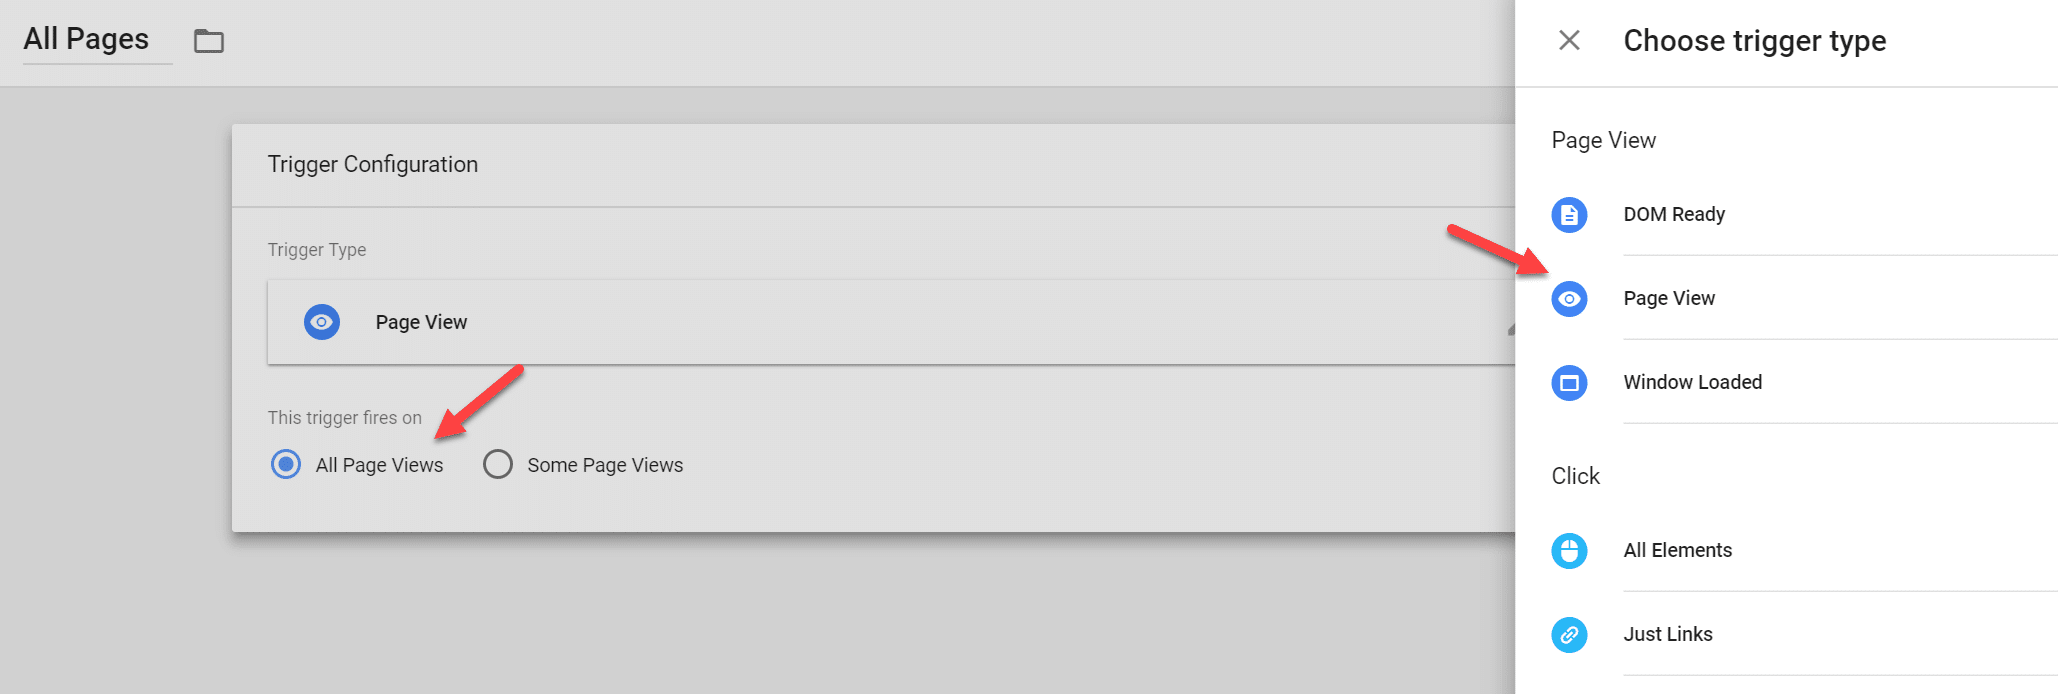
Next, you need tell GTM where or when to fire your tracking code.
We’ll need to put that condition into Triggers. By default, we will trigger tracking pixels across the entire website.
Add in your tracking script into the blank area.
Remember to name your tag and hit Save.
Next, you need tell GTM where or when to fire your tracking code.
We’ll need to put that condition into Triggers. By default, we will trigger tracking pixels across the entire website.
 Create a new trigger and choose Page view, and then All page views. Hit Save again.
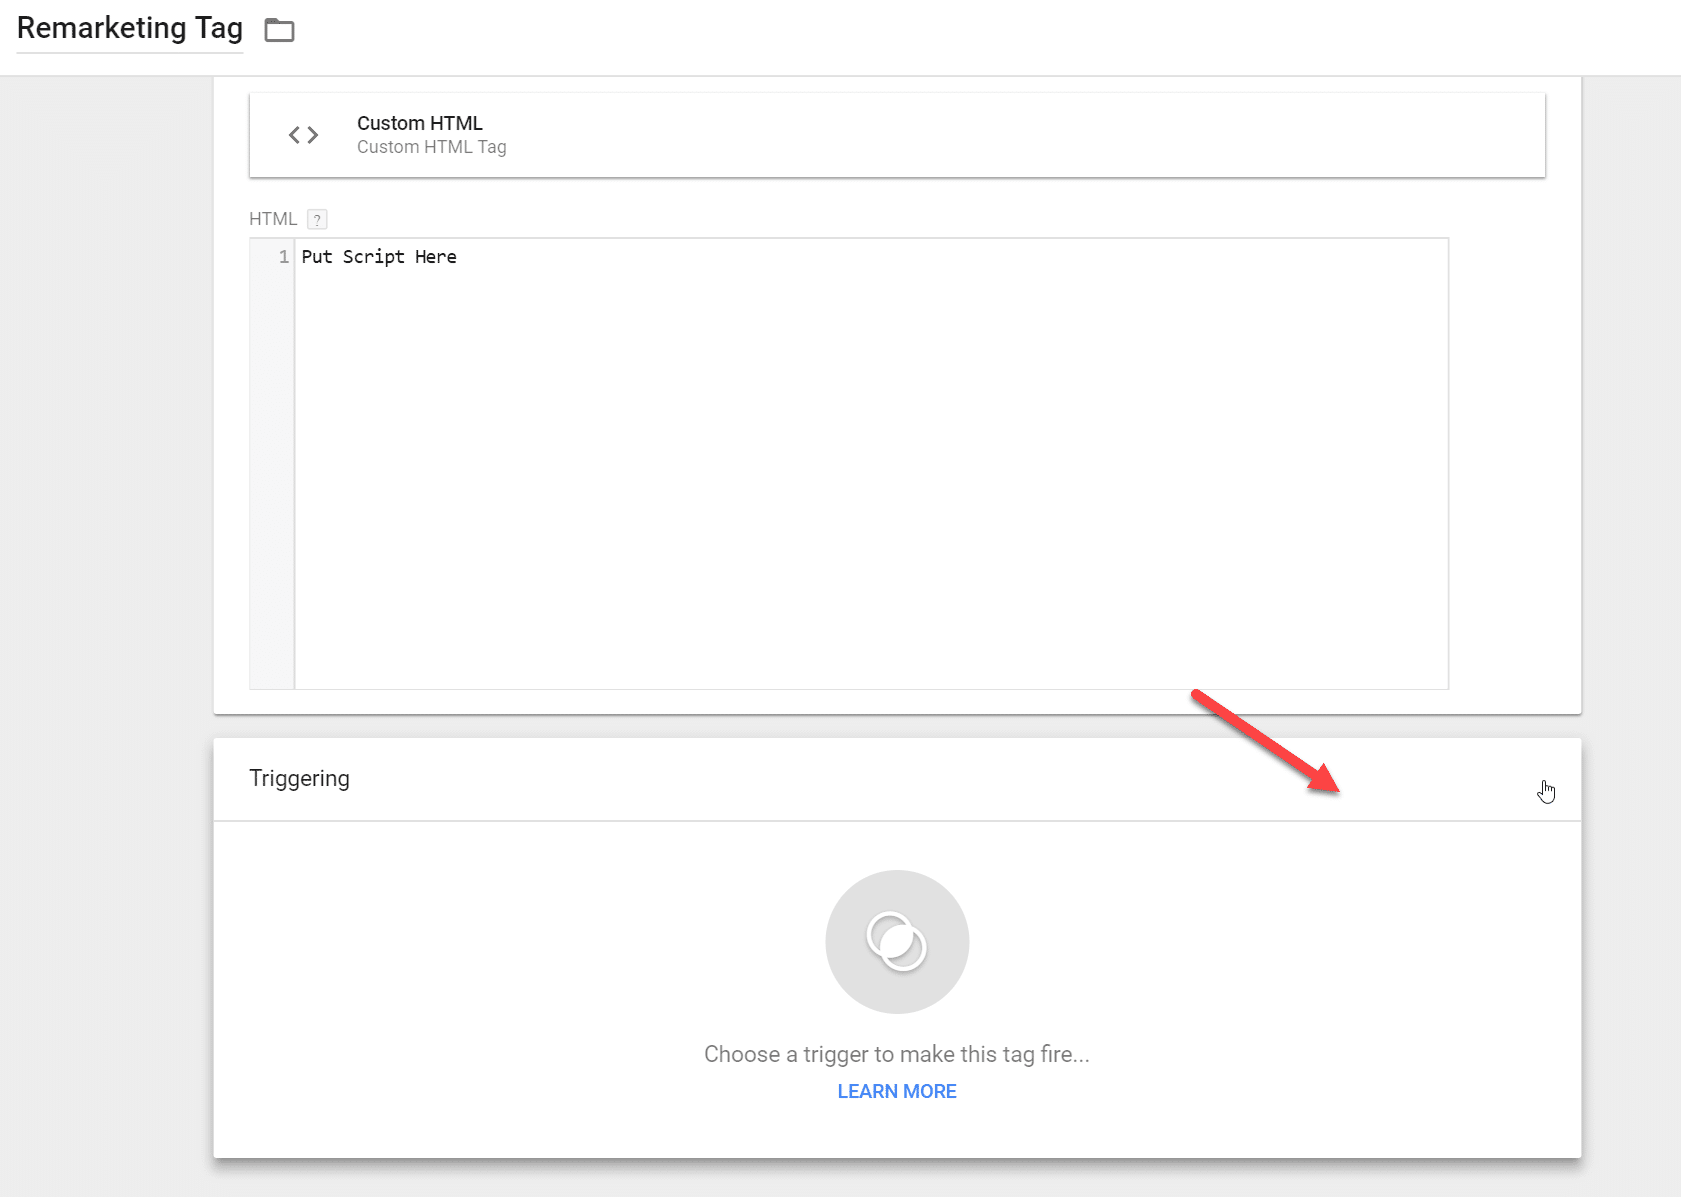
At this point we have our tag and our trigger. For it to work, we need to pair them up.
Create a new trigger and choose Page view, and then All page views. Hit Save again.
At this point we have our tag and our trigger. For it to work, we need to pair them up.
 Click and add the trigger that you have created – Hit Save again.
Once this is done, your tag and trigger pair is done, and you’ll need to hit Submit to publish the changes to the website.
We established earlier that remarketing is a valid strategy but that we don’t want to remarket to everyone. Here’s what we want to do.
Fire your remarketing pixels to only those who matter.
We’re going to use Google Tag Manager (GTM) to do that.
I’m going to go through two ways you can skin this cat, but you are only limited by your imagination, and by what your situation requires.
Firstly, we’re going to filter by time.
Here’s the logic. If we determine that visitors of 5 seconds or less are not the right audience to remarket to, then we will only want to pixel visitors of 5 seconds and greater.
Method 1: We can use the timer function inside of GTM to do that:
Click and add the trigger that you have created – Hit Save again.
Once this is done, your tag and trigger pair is done, and you’ll need to hit Submit to publish the changes to the website.
We established earlier that remarketing is a valid strategy but that we don’t want to remarket to everyone. Here’s what we want to do.
Fire your remarketing pixels to only those who matter.
We’re going to use Google Tag Manager (GTM) to do that.
I’m going to go through two ways you can skin this cat, but you are only limited by your imagination, and by what your situation requires.
Firstly, we’re going to filter by time.
Here’s the logic. If we determine that visitors of 5 seconds or less are not the right audience to remarket to, then we will only want to pixel visitors of 5 seconds and greater.
Method 1: We can use the timer function inside of GTM to do that:
 Method 2: We can also filter by how far a visitor scrolls down your page—Scroll depth:
 That’s it.
By doing so, non-essential visitors are effectively eliminated from the remarketing audience, making it much more efficient data for your campaigns to learn and work from.
That’s it.
By doing so, non-essential visitors are effectively eliminated from the remarketing audience, making it much more efficient data for your campaigns to learn and work from.

Introduction to remarketing
Digital marketers have long touted remarketing campaigns as the holy grail to improve your digital campaigns’ performance and ad spend. Rightly so. A fundamental adage of marketing – the rule of seven – implies that a prospect needs to hear or see a marketing message at least seven times before they decide to buy from you. When remarketing technology via pixels and cookies became available, smart marketers adapted that into their overall strategy with great results. Given a typical conversion rate of 3-5% of any given website, that means almost 97% of website visitors are wasted. That’s a huge marketing waste down the drain. With Facebook and Google being the dominant players in this market, most businesses should have been at least aware of remarketing technology by now. As visitors visit your website, you “pixel” them, allowing their journey through your website to be recorded and the ability to then remarket to them on their personal newsfeed or on various other websites they will visit. With enough reminders, these prospects will eventually act and buy from you. A completely sound marketing strategy that your digital marketing agency should implement, when possible. One little problem.
Not all website visitors are valuable – Truth.
Not every website visitor is an interested prospect. No matter what you do, they will never buy from you. These visitors could be:- Accidental clicks
- Visitors who are just curious
- Competitors
- Traffic from bots and fake profiles
Introduction to Google Tag Manager
Google Tag Manager, or GTM, was introduced as a way to manage scripts and tags in a simplified, integrated container. It is designed to reduce the need to code, making it much easier to go from development to a live website. Instead of having to dig into the source code of a website, marketers can now easily and quickly deploy tags through Google Tag Manager’s Interface. This enhances the workflow of web development, and creates a bridge between marketers with web developers. How it works: Google Tag Manager works with tags and triggers. Tags are containers where scripts and tracking pixels are placed. You can embed Facebook Pixels and Google Analytics code all within one simple dashboard. Triggers are events that occur on the website, such as a page view, a timed duration, or when a visitor clicks on a certain element on the site. As the name implies, when a trigger occurs, an associated tag is fired. This tag and trigger pairing is essentially how Google Tag Manager works. With that basic understanding of what Google Tag Manager is, let’s talk about how we can use it to improve our remarketing campaign.Google Tag Manager: a money-saving tactic
 Let’s start by using GTM to implement our remarketing pixel. Grab your Google Ads or Facebook Pixel tracking code. At this point, we’ll be going with the assumption that GTM is already installed on your website. If not, read Google’s installation guide here.
We’ll want to put any tracking code into the “Tags” portion of the Google Tag Manager dashboard.
Let’s start by using GTM to implement our remarketing pixel. Grab your Google Ads or Facebook Pixel tracking code. At this point, we’ll be going with the assumption that GTM is already installed on your website. If not, read Google’s installation guide here.
We’ll want to put any tracking code into the “Tags” portion of the Google Tag Manager dashboard.
 Click on Tags and, once you are there, you can click on New to add a new tag. Or, you can click on Add a new tag to add a new tag directly.
There are a number of tags that are supported, including Google Analytics – which you could add via GTM as well.
But let’s say we want to add in our custom remarketing code. Choose Custom HTML.
Click on Tags and, once you are there, you can click on New to add a new tag. Or, you can click on Add a new tag to add a new tag directly.
There are a number of tags that are supported, including Google Analytics – which you could add via GTM as well.
But let’s say we want to add in our custom remarketing code. Choose Custom HTML.
 Add in your tracking script into the blank area.
Remember to name your tag and hit Save.
Next, you need tell GTM where or when to fire your tracking code.
We’ll need to put that condition into Triggers. By default, we will trigger tracking pixels across the entire website.
Add in your tracking script into the blank area.
Remember to name your tag and hit Save.
Next, you need tell GTM where or when to fire your tracking code.
We’ll need to put that condition into Triggers. By default, we will trigger tracking pixels across the entire website.
 Create a new trigger and choose Page view, and then All page views. Hit Save again.
At this point we have our tag and our trigger. For it to work, we need to pair them up.
Create a new trigger and choose Page view, and then All page views. Hit Save again.
At this point we have our tag and our trigger. For it to work, we need to pair them up.
 Click and add the trigger that you have created – Hit Save again.
Once this is done, your tag and trigger pair is done, and you’ll need to hit Submit to publish the changes to the website.
We established earlier that remarketing is a valid strategy but that we don’t want to remarket to everyone. Here’s what we want to do.
Fire your remarketing pixels to only those who matter.
We’re going to use Google Tag Manager (GTM) to do that.
I’m going to go through two ways you can skin this cat, but you are only limited by your imagination, and by what your situation requires.
Firstly, we’re going to filter by time.
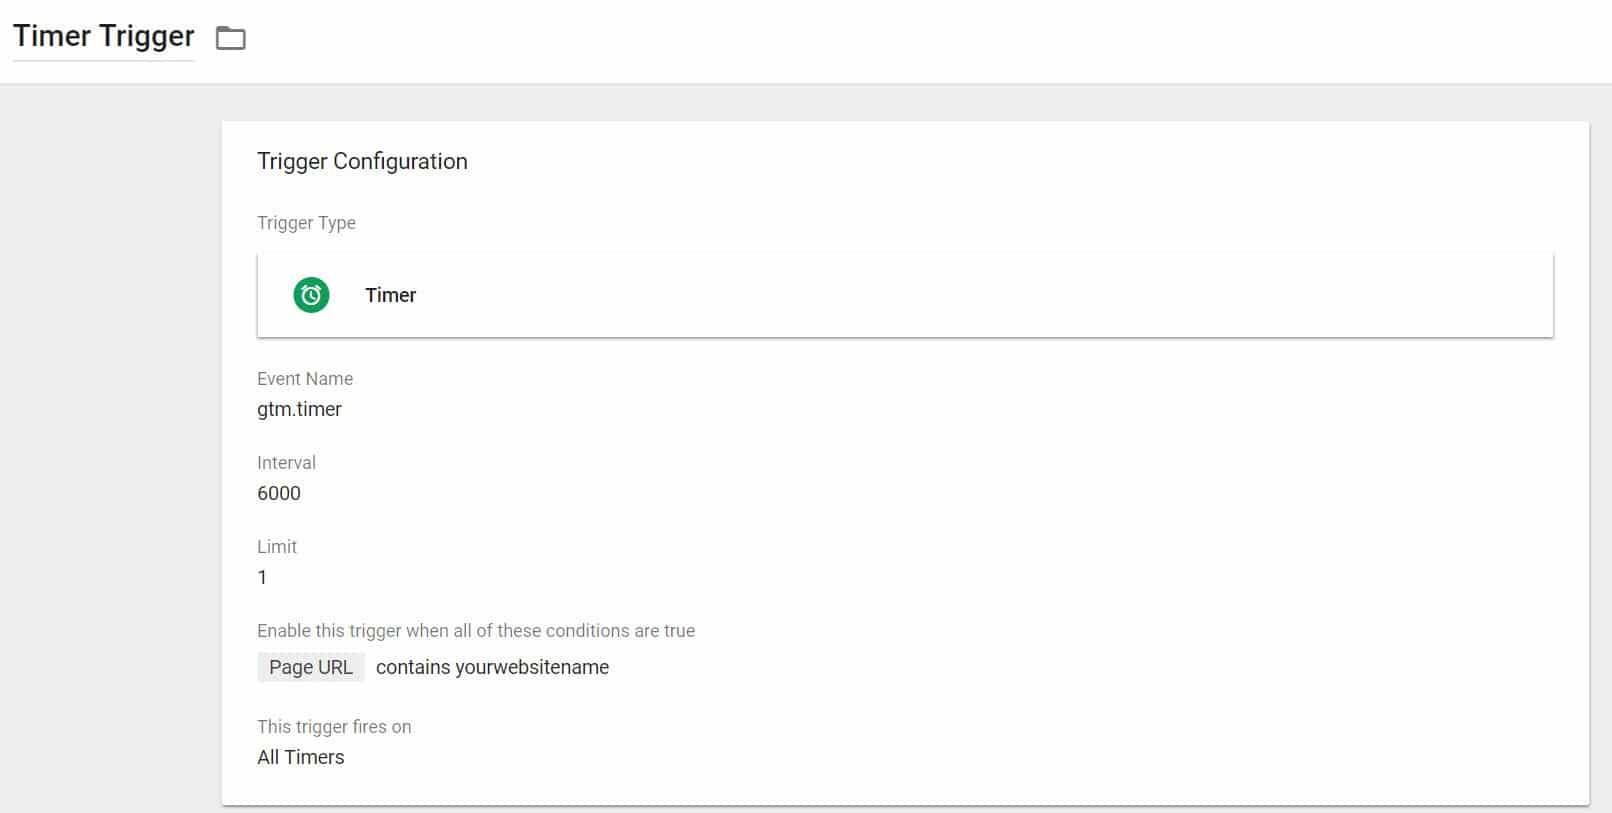
Here’s the logic. If we determine that visitors of 5 seconds or less are not the right audience to remarket to, then we will only want to pixel visitors of 5 seconds and greater.
Method 1: We can use the timer function inside of GTM to do that:
Click and add the trigger that you have created – Hit Save again.
Once this is done, your tag and trigger pair is done, and you’ll need to hit Submit to publish the changes to the website.
We established earlier that remarketing is a valid strategy but that we don’t want to remarket to everyone. Here’s what we want to do.
Fire your remarketing pixels to only those who matter.
We’re going to use Google Tag Manager (GTM) to do that.
I’m going to go through two ways you can skin this cat, but you are only limited by your imagination, and by what your situation requires.
Firstly, we’re going to filter by time.
Here’s the logic. If we determine that visitors of 5 seconds or less are not the right audience to remarket to, then we will only want to pixel visitors of 5 seconds and greater.
Method 1: We can use the timer function inside of GTM to do that:
- Create a trigger using the Timer module. Use a time that makes sense to you.
- Create your remarketing pixel tag.
- Pair the pixel trigger with the pixel tag.
- Publish the GTM container to your website. (That’s it!)
 Method 2: We can also filter by how far a visitor scrolls down your page—Scroll depth:
- Create a trigger using the Scroll depth. You can choose any percentage. For example. If you think a user is considered engaged if they read through at least 50% of the content, then use 50.
- Create your remarketing pixel tag.
- Pair the pixel trigger with the pixel tag.
- Publish the GTM container to your website. (Done!)
 That’s it.
By doing so, non-essential visitors are effectively eliminated from the remarketing audience, making it much more efficient data for your campaigns to learn and work from.
That’s it.
By doing so, non-essential visitors are effectively eliminated from the remarketing audience, making it much more efficient data for your campaigns to learn and work from.
Setting up remarketing campaigns:
Once your remarketing pixel has been activated and there are sufficient data (visitors) for the remarketing pixels to work, you will need to create remarketing campaigns in the respective platforms. You can create standard remarketing or dynamic remarketing campaigns within Google Ads. Likewise, you can create standard remarketing campaigns or dynamic remarketing campaigns within Facebook itself. Click here for more information on how to setup a Google Ads remarketing campaign. To learn more about how to set up a Facebook remarketing campaign by creating a custom audience, click here.Bonus tip:
A part of remarketing campaigns that is often missed out is remarketing to visitors that have already purchased from you. Unless you are doing a re-engagement exercise to reach out to existing buyers, you will almost certainly want to exclude these audiences from your remarketing campaign. You can do so by maintaining a list of buyers that is synchronised with your advertising platform (Facebook and Google allows this.) Or exclude the audience that has reached a certain URL in your campaign flow, such as the Thank you page. Hopefully this has given some ideas to make your advertising budget go the extra mile. With this, you can either cut down on your remarketing spend on the wasted 75%, or spend the full allocated amount on the audience that mattered. Jonathan Ang runs Adscelerate Marketing, an SEO Company based in Singapore. He shares his thoughts on Digital Marketing, Business Strategies and SEO on LinkedIn and Twitter (@jonathan_ang)Published by
Alexis Pratsides